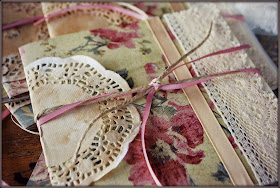
 Whenever I host a party, I always give a lot of thought to the invitations. This is the first contact your guests will have with your event and you want to lure them in with a dose of handmade gorgeousness. I know custom made printable invitations are all the go at the moment, and yes, they are lovely. Call me old fashioned, but I prefer the feel of ribbon, lace, pretty paper, string and buttons. By taking the time to create your own invitations, you are building a sense of anticipation in your guests and heightening their expectation that your event will be one to remember!
The good news is that you can make beautiful invitations that suit the theme of your event, with a few simple materials and at a surprisingly low cost. They do take time, but if you love being crafty and enjoy spending a few quiet nights with paper and glue, then you will find the whole process quite simple and very relaxing.
1. Choose a theme and colour combination for your party.
Do you want your party to have a shabby chic feel to it with pretty pastels and lace, or a more formal, victorian and old world look? Perhaps a rustic, woody theme with burlap and brown paper? Establishing your theme helps you to narrow down the colours and patterns you want to use for the invitations, and makes it easier to continue them throughout the elements of your party.
2. Buy scrapbooking paper and cardboard that matches your theme.
This is usually the first thing I do when making invitations. Sometimes I think I live at Spotlight. I am always there checking out their range of paper, ribbon, fabric and rummaging through the sale bins. It depends on the number of people you are inviting, but you won't need a whole lot of paper. I like buying the matching ranges of paper which complement each other. Buy plain cardboard to match.
Walking through Spotlight or Lincraft, base everything on this paper and see what you can find that goes well with it. Strips of lace, ribbons, string, oh and my favourite....buttons. Glorious buttons.
3. Buy white cardstock or pre made cards to decorate.
These square cards below were bought from Spotlight. I love them. You can get envelopes to match and they are very easy to decorate. Sometimes I just cut out a rectangle of white cardstock to use vertically for a simple invitation. Again, I cannot stress enough how inexpensive this is.
4. Decorate, decorate, decorate.
Now comes the fun part. Put the kids to bed, turn off the tv, put on some nice music and cut, paste and stitch to your hearts content. Make double sided scrapbooking tape your best friend. I use this to stick most things on my cards. It has better adhesion and looks a lot neater. Again, buy it from Spotlight or Lincraft.
On the invitation below, I tea died some cheap paper doilies and stuck them around the card before tying it all up with ribbon and string. On the inside of the card, using double sided tape, I put a strip of lace over a piece of printed see through paper which contained all of the party details.
5. Continue your theme throughout the party.
As you can see, I continued the same elements from the invitations onto the table settings. These favour boxes were tied with the same string, ribbon, and lace, while the menu cards underneath were made with matching scrapbook paper.
There are many different ways to make beautiful invitations that don't cost the earth. Your guests will marvel at the detail and time invested in each unique invitation. They can be as simple as using a scrap of fabric and a button, or as elaborate and ornate as you like. The only limit is your imagination. Let me encourage you, when you are next planning that lovely tea party or baby shower, to do something special and make the invitations yourself. In our fast paced, computer dependant lives, I dare you to resist the generic email or Facebook invitation and surprise your guests with beautifully hand made invitations that they will most likely keep for a long time......and I bet they will also take the time to rsvp you!
Enjoy!!
XXX


No comments:
Post a Comment